Couldn't make this software do what I needed to.. so I moved the whole blog while it wasn't a huge chore... check it out- http://currentcompulsion.wordpress.com/
thanks!
Friday, May 25, 2012
My childhood desk's new life.
With all furniture re-doing around here, the second daughter (Cori) was bound to want something for herself eventually. She finally said something, spurred on by my asking and it was decided she'd like a desk.
We searched Craigslist... missed out a few super cute ones and finally found something. I bought it... and she changed her mind. Hrmphhh.... ok....
However, then she did something surprising. She decided she wanted the desk in the garage. Now the desk in the garage was part of the furniture collection my parents purchased for me when I was a budding tween and it's ok... The desk is in great shape, it is great quality and all, I just think it is ugly. I always thought it was ugly. It has these weird orange flowers and I have never liked them.
Of course, I forgot to take a before picture. However, I do have a before picture of the matching nightstand to give you an idea-

See? Cute, and yet... ugly..
ok, so what do we do with it? Well, this girl has a wild streak. She LOVES animal print. The tackier and louder the better. She is full-on, throw-back to the 80's. So I thought fabric would be the best place to start. So we headed over to the trusty internet and found some acceptable cheetah print (and super cute I might add) and ordered that.
It finally got here and I bought paint and then got busy. So it sat. Then about a week ago I got a wild hair and just started it one afternoon. The cute little girl at my favorite antique store where I buy my fabulous ASCP had the brilliant idea of using spray paint under the regular paint to distress to a color that would work better for Cori. So off to the big box store for spray paint.
I put the desk and matching chair out on the driveway with an old shower curtain liner under it, pulled out the drawers and gave it a few sprays...

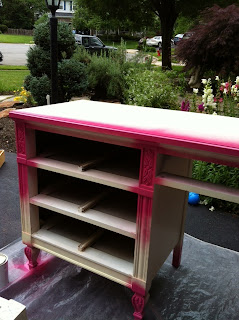
 The neighbors thought I was crazy when I then painted over all the paint I just sprayed. (Those drawers sat in the driveway all day like that.)
You don't normally need two coats of paint. I went ahead and did two coats any way. I wanted the pink to be good and covered and I wanted to make sure the old white and blue colors didn't bleed through.
Once those layers were dry I threw on a quick coat of wax and then took a piece of medium grit sandpaper (180 I think) and gave a quick swipe to a few of the areas that had the pink spray originally. One more coat of wax for protection and it was done.
I firmly believe if you're going to do something, you might as well go crazy so I took the spray paint and gave a quick pass to the insides of the drawers and the hardware too (after I removed it front he drawers). Then two coats of paint and wax on the drawer fronts and the hardware was dry so I gave that some quick wax for protection and rubbed a little hard in some spots just to give them a minor distress.
Once it was all dry I tok the fabric I had used to recover the chair and cut pieces to fit the bottom of the drawers. A coat of mod podge and quick sanding to finish them off and the drawers were ready too.
Here is the finished product:

 I just love the way the woodwork is highlighted with the paint distress. The hardware stands out so well too. All in all, I am pretty pleased with this one.

We searched Craigslist... missed out a few super cute ones and finally found something. I bought it... and she changed her mind. Hrmphhh.... ok....
However, then she did something surprising. She decided she wanted the desk in the garage. Now the desk in the garage was part of the furniture collection my parents purchased for me when I was a budding tween and it's ok... The desk is in great shape, it is great quality and all, I just think it is ugly. I always thought it was ugly. It has these weird orange flowers and I have never liked them.
Of course, I forgot to take a before picture. However, I do have a before picture of the matching nightstand to give you an idea-

See? Cute, and yet... ugly..
ok, so what do we do with it? Well, this girl has a wild streak. She LOVES animal print. The tackier and louder the better. She is full-on, throw-back to the 80's. So I thought fabric would be the best place to start. So we headed over to the trusty internet and found some acceptable cheetah print (and super cute I might add) and ordered that.
It finally got here and I bought paint and then got busy. So it sat. Then about a week ago I got a wild hair and just started it one afternoon. The cute little girl at my favorite antique store where I buy my fabulous ASCP had the brilliant idea of using spray paint under the regular paint to distress to a color that would work better for Cori. So off to the big box store for spray paint.
I put the desk and matching chair out on the driveway with an old shower curtain liner under it, pulled out the drawers and gave it a few sprays...


You don't normally need two coats of paint. I went ahead and did two coats any way. I wanted the pink to be good and covered and I wanted to make sure the old white and blue colors didn't bleed through.
Once those layers were dry I threw on a quick coat of wax and then took a piece of medium grit sandpaper (180 I think) and gave a quick swipe to a few of the areas that had the pink spray originally. One more coat of wax for protection and it was done.
I firmly believe if you're going to do something, you might as well go crazy so I took the spray paint and gave a quick pass to the insides of the drawers and the hardware too (after I removed it front he drawers). Then two coats of paint and wax on the drawer fronts and the hardware was dry so I gave that some quick wax for protection and rubbed a little hard in some spots just to give them a minor distress.
Once it was all dry I tok the fabric I had used to recover the chair and cut pieces to fit the bottom of the drawers. A coat of mod podge and quick sanding to finish them off and the drawers were ready too.
Here is the finished product:


Just wait.. some lady gave me a bar height table (with leaf) and 6 chairs the other day... Brian is going to kill me, but I plan on selling them on Craigslist when I'm done, so that's got to be ok, right?
I already re-did one of the seat covers and bought the paint this morning.
(Is there some kind of support group out there I should be looking into...?)
Thursday, May 3, 2012
Annie Sloan Chalk Paint
Annie Sloan Chalk Paint... How do I love thee? Let me count the ways.... Yep, found out about it from Pinterest. Knew I wanted to re-do a vanity for Miss Gracie and found a great one on Craigslist. Did I feel like sanding, priming and working...like I did with Abbie's dresser? Nope.
What was Abbie's dresser you ask? Well, it's still a work in progress so I am waiting to post when I am more finished. Did I mention I have ADD? There are quite a few projects going here at the moment....
Back to this chalk paint.... It's phenomenal! No sanding, no priming, very little prep work. Annie calls it paint for girls- I call it paint for ADD moms. I'm busy, I have lots going on... in actuality and in my brain. I have 4 (yes 4!) kids. Two teens and two (for all intents and purposes) babies. I'm over stimulated, over scheduled, over... everything. I'm a little lazy too so it really appeals to that side of me as well.
After I read about it, went to probably 15 or 20 different blogs and YouTube Videos about it, and found a local supplier, I decided this was THE paint for me. Lucky me the distributer is at a super cute antique store I had wanted to visit for years!

Isn't it just adorable? Don't you just want to pull right in and look around? I was thrilled to have an excuse. Heading in, I went upstairs (because I of course in my WAY over-thought process had read their blog and knew where the Annie Sloan section was) and after looking around a bit was greeted by Celeste. She's the resident expert and Annie Sloan stockist. This means she knows everything about it. Hooray for me! I had my fabric samples with me and was trying to figure out which colors would look best. If I had to state a downside to ASCP, I would say the color selection is a little limited. I was able to work with it just fine though and pick a great color- "Antoinette".
I headed home and decided to dig in. Ok, I will confess I had sanded the vanity prior to discovering ASCP, I had not however primed it. It really had to be sanded in some spots, there were so many layers of paint on it, some of the details were starting to disappear.
So here is the before:


I headed home and decided to dig in. Ok, I will confess I had sanded the vanity prior to discovering ASCP, I had not however primed it. It really had to be sanded in some spots, there were so many layers of paint on it, some of the details were starting to disappear.
So here is the before:

No idea how many times it had been painted. The last time was a sort of white and then the lady had put down that rubber-ish no slip mat stuff you put in your glasses cabinet to keep it from chipping. When she pulled it up, it stuck... and left fantastic impressions all over (you can see them if you look closely)... so those HAD to be sanded out. I started hand sanding...and then remembered my husband has this mouse thing... found that and it went SO much quicker.
Then there were the grooves on the sides. The mouse was just going to kind of flatten them out. Solution? The husband's Dremel thing. (It's actually made by Black & Decker so I don't know what it's called) Bought some sanding rings and tried to define the grooves a little more. Not perfect but it worked for me- plus Gracie is 3- she won't care.
Ok, now we've got this:

Pull out the ASCP and go to town! Here is the start:

Not bad... covering pretty good (see the top?) Feeling good about this project. One coat and it looked like this:

I'm happy with it. Plus the few brush strokes I can see will be almost gone when I apply the wax...so I was told. I decided to forgo the purchase of the wax brush when I got the paint and use a rag. The wax application is really easy- it's soft so you just put a little on your rag and rub it in like you would lotion on your skin. It's like polishing your shoes if you've ever done that? It darkens the paint just a bit- good so you know where you've waxed, goes back to the normal color after it dries. Oh, and there are two different kinds of wax- clear and dark. I chose clear. I didn't think I needed to get too fancy with my first project. So once you wax the whole thing, you decide if you want to wait and buff it out tomorrow or use very fine sandpaper (500-600 grit) and put the smoothest finish on it. I decided to wait out the finish since I still needed to at attach the fabric. Fabric? Yep, I decided to go whole hog with my fist project. So I waxed the two sides, not the lower part and pulled out my fabric and Mod Podge.
Measure twice and cut once, right? Ummm... yea. So I measured and cut and checked it out. Decided to leave the front part long and sides a little long and trim after it dried- I was worried about shrinkage.

Cute right? Laid down a layer of Mod Podge and smoothed out the fabric. Another layer of Mod Podge on top (carefully avoiding the raised sides) and wait.... says dry in 20 mins it was about an hour (humidity played a part). Found the utility knife and cut along the corners on top and down the sides.
Now I'm left with this:

I felt for the edge and used the utility knife at an angle to slowly cut along the front edge. (Hopefully you can picture it in your mind, I forgot to take a photo, sorry.) Then a slapped on another layer of Mod Podge and let it dry. Once it was dry I pulled out the coordinating fabric and laid that across the front flat piece and repeated the same procedure. Once that was all done, I smeared on the rest of the wax and walked away.
Next day I grabbed a soft cloth and buffed the heck out of it. After essentially repeating what I had done the day before, I think next time I'll spring for the brush. The can of wax last pretty much forever since you don't use much and I hardly touched probably 10% of the quart of color I bought. Good thing, ASCP isn't cheap... but it's completely worth it. (Lol- Maybe I should have used that philosophy with the painted chair?)
So my 15 had this chair when she was little:

Perfect right? Except the seat doesn't match. Nothing more fabric and a staple gun can't fix. Oh yes, I painted and waxed the chair too so it would look like it goes together. DId you know you can use this paint and wax on outdoor furniture? You're starting to get intrigued aren't you? I told you it was awesome!
SO drug the whole thing up to her room, attached the mirror, set up her chair and WA LA!

Oh yes, I totally forgot, for a finished look, I lined the drawers with the circle fabric that's on the front, and Mod Podged wooden knobs I bought at the Big Box Hardware store to match.
See that odd thing that sticks out of the side near that jewelry box? I think it was for a glass shelf. Well, glass is pricy and my 3 year old can break or destroy anything. In the interest of her safety, I decided a few days later to make a shelf out of some wood I had used to make jewelry displays earlier this year. I cut it to size, sanded the edges, one coat of paint, wax and this time thought I would try the sanding technique. When you do this, you don't have to wait for the wax to dry at all. You just apply nearly no pressure to the sand paper and rub it around the waxed surface. You almost feel the wax blend into the paint. It gives an even smoother finish and I really liked it for the shelf.
Here is the totally finished product:

What do you think? Pretty neat huh? Gracie LOVES it!
Monday, April 30, 2012
My second attempt...not so much.
Have you seen the amazing Pin of the Painted chair? No? Well, it's here and it's AMAZING. The concept is amazing, the color is amazing, the whole idea is just amazing. I totally wanted a chair JUST like that one....yea. That's what started it. She makes it sound fantastic and SO easy. In theory... it is. In practice... it needs to be a perfect storm coming together I think. At least that is what I have deduced so far.
Here's my version:

Don't laugh.... ok, not quite as transparent as in the photo, but it's horrid. Amusing really. I'm still working on what to do with it exactly, and I'll get to that later.
First thing's first- This is the chair before:


Here's my version:

Don't laugh.... ok, not quite as transparent as in the photo, but it's horrid. Amusing really. I'm still working on what to do with it exactly, and I'll get to that later.
First thing's first- This is the chair before:

Ugly, right? As it sat in my kitchen for nearly a week, it kind of grew on me. Yes, it was ugly..though I was a little sad to cover it all up.
I finally decided to dig in. I L.O.V.E.D. the Teal color used on the "other" chair, so why not? Let's just use that color.
I then did HOURS of research on paint, trying to find a fabric paint to brush on instead of spray like a hairspray bottle. Did I mention I over think just about everything?
I fell in love with Simply Spray- a really cool spray paint like fabric paint that is easy to apply, and the fabric feels amazing. You can't even tell there is paint on it- not kidding. I found what looks promising in an opaque fabric paint made by Jacquard called Neopaque. (In hindsight, this probably would have been my best option) I found more tutorials than you can imagine about adding fabric medium to acrylic paints and even just using regular spray paint, right out of the can. Totally overwhelming.
In the end, I decided experimentation was the best way to start. So I pull the bottom fusion from a slipcovered chair in my bedroom (with a print so bad I had totally forgotten how ugly it was) and went to town.

Top right is the Simply Spray- Probably two coats. Not opaque enough to cover the pattern, so it was off the list. In the middle (brighter blue) was the fabric medium- It was too stiff and crunchy so cross that off. Bottom right was the Tulip fabric spray paint. Probably 3 maybe 4 layers to cover the print. I also tried the Tulip Soft Fabric Paint under the spray to see if it would help cover some of the pattern. Maybe... but it was too bright white and messed with the Teal color too much. The Tulip Spray was a little stiff but I figured with a little sanding it would be fine. That was the color I really wanted so I decided on that one.
Now I took a good look at that chair-

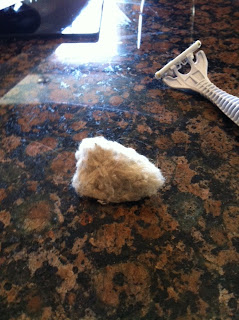
Can you see it? Yep, those lovely "pills" all over. Ok, time to get out the razor. I gave it a shave:

It started to look like this:

when I was done, I had a pile of fuzz:

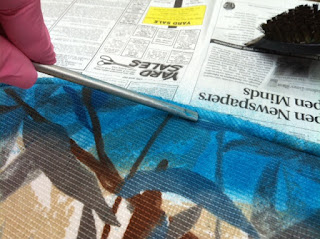
I started on the bottom cushion. I went outside and laid out newspapers, I sprayed and sprayed. I used a tool I found (No idea what it is) to hold back the piping:

I kept spraying... when I was done, it looked like this:

Well, that was only the first layer I told myself. It would look so much better tomorrow after I let it dry and sink in then spray it again... Right.
2 more coats later- it looks like what you see above. It sits in the middle of my living room. It is SO much more green than it looks in the picture, almost neon and it sort of glows... I'm serious. I am not upset about it. I mean, I don't like to waste money and I wish it would have been so awesome the first time out of the gate, but looking at it makes me giggle.
I haven't figured out what to do with it yet. I might try the purple Simply Spray over it. I might bite the bullet and buy the Neopaque I probably should have invested in to start with. Either way, I'll do something. I'll certainly update when I decide. Any ideas you may have would certainly be welcomed as well.
My first go at recreating a Pin went pretty well. The young girl up the street was having a baby. We gave her a neighborhood shower. How fun! We all contributed to a gift, sweet. I wanted to do a little bit more. Who doesn't love handmade things for your new little one? Who doesn't love CUTE things to hang on her wall? The baby was going to be a girl! Score!! Super cute girl- things are SO easy to find on Pinterest. Had to be something I could do super quick though. I have 4 kids, the two youngest of which are 3 1/2 and 2 and crazy busy... into everything.
Button Art?! Yes, button art! Do I have any buttons? Of course not- I don't sew, I don't collect buttons, I don't scrapbook. SO it was perfect, right? Surely a quick run to JoAnn's Fabric and Crafts will fix all of that.
Have you ever been a not-so-crafty girl in JoAnn's? It's a tad overwhelming. Ok, found the buttons.. Umm, what size? what color? She's a girl, so pink is good. Surely there is some jar of buttons I can purchase and figure it out when I get home. Nope. That would be too easy. Ok, small bag of various shade of pink buttons, check. How many do I need? Ummm... probably lots and lots. I'll buy three bags and come bag if I need to.
Back ground for this "art"? Scrapbook paper... fabric might be too busy. Head to paper aisle... Wow! Umm, just wow. Seriously, SO many different kinds, finishes, patterns, oy! Decided on a solid after wasting WAY too much time looking for a small girly print that wouldn't hide the buttons. A light pearl-y purple.
On to frames... Oh dear. Is her furniture white? Is it dark? Is it natural colored? I vaguely remember her mother making a comment about espresso... a quick call to their house to ask her father... who had no idea and when he checked said it was "dark colored". Works for me, dark frame it is. Grabbed a cute oval frame and on to the next stop...
How to attach the buttons? Glue, what kind.. Do you have ANY idea how many kinds of glue there are? Good Golly- I do now. I decided hot glue would do it for me this time. (Ok, in hindsight, there are probably easier glues I could have picked for this project) I don't own a hot glue gun.. lol, the choices of those are vast as well. I decided the hotter one would work for longer term and bought the cheapest one as well as a small bag of additional sticks. It happened to be pink- I considered that a good omen.
Pretty sure I had everything- Lord knows how much the whole trip cost me. Thankfully I have misplaced the receipt and never listen to the cashier when they announce the total. Home again, home again, jiggedy jig.
I layer everything out on the table. I needed a letter to use as a guide. Oops, hadn't really thought that far. Checked out the "Pin" I was copying.. What luck! It was an "S" just the letter I needed. Printed it out as large as I thought would work for my frame and cut it out to trace on the lovely purple paper in pencil.
Then I laid out the buttons over my pencil marks to try to get an idea for how it was going to work. Turns out it was going to look pretty cute! Hooray! Wasn't this going to be so cute?! I then just went to town glueing buttons. This is where a thing a different kind of glue might have been a better choice. Hot glue doesn't move when you place it. White glue does. Sure, it takes longer to dry, there is just a bit more flexibility there. White glue is also less "stringy" hot glue has these string of plastic that just hang form the gun to your project. It's a chore and a half to clean them all up when you're done. It did work though, so as I didn't have additional paper, that was a blessing.
Here is the finished product:

All in all, not so bad for a first try. What do you think?
My Pinterest Problem
My name is Scottie, and I am a Pinterest-aholic. There. I've said it. I know I am not the only one. There is no way I can be.
The biggest issue? I have NO desire to stop. It's probably making my family crazy... ok, I KNOW it's making my family crazy. My 15 year old got a splinter last night.. before I tried to help her get it out I said "Oh, I saw a help for this on Pinterest." They all rolled their eyes and groaned... This is a common occurrence in my house lately.
I would curse the person who introduced me to Pinterest... except I am grateful. It sparks my creativity, my need to do something, and makes me feel like me. So to her, I say, THANK YOU!
Subscribe to:
Posts (Atom)